Air layering is one of the most effective, reliable, and exciting methods of plant propagation—especially for home gardeners who want to multiply their favorite plants without buying new ones. Whether you’re working with fruit trees, ornamentals, or woody shrubs, air layering allows you to create strong, well-rooted seedlings right on the mother plant before ever cutting them off. This technique is ancient, but gardeners continue to use it because it delivers fast, successful results with very little risk.
In this comprehensive 1200-word guide, you’ll learn everything about air layering—from how it works to step-by-step instructions, best materials, common mistakes, and expert tips to ensure your seedlings grow vigorously. Let’s dig in!
🌿 What Is Air Layering and Why Is It So Effective?

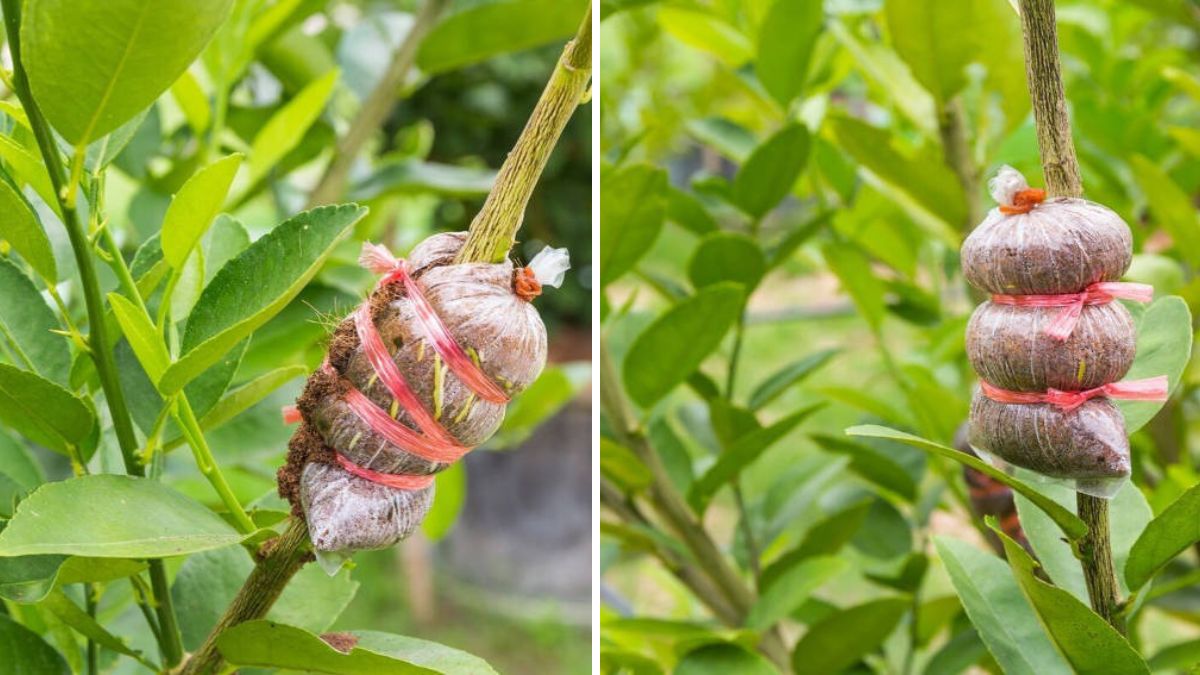
Air layering is a propagation technique where you encourage a branch or stem to produce roots while it is still attached to the parent plant. Once the new roots develop, the branch is cut off and grown as an independent plant.
Unlike seeds or cuttings, air-layered seedlings have several major advantages:
✔ Faster Growth
They already have a developed root system even before being planted, so they grow much faster than seed-grown plants.
✔ High Success Rate
Since the branch is never separated from the mother plant until it forms roots, the risk of failure is extremely low.
✔ Stronger Seedlings
Air layering produces stronger, thicker stems and more robust root systems.
✔ Clones of the Parent Plant
This guarantees the same flavor, fruit quality, flower color, or growth characteristics.

✔ Ideal for Hard-to-Root Plants
Plants like guava, lemon, mango, hibiscus, bougainvillea, figs, and rubber plants respond exceptionally well to this method.
🌳 Best Plants for Air Layering
Although many plants respond well to air layering, some species perform exceptionally:
Fruit Trees
- Guava
- Mango
- Lemon and orange
- Pomegranate
- Fig
- Litchi
- Sapota (chikoo)
Ornamental Plants
- Rubber plant (Ficus elastica)
- Croton
- Hibiscus
- Bougainvillea
- Rose varieties with woody stems
These plants root quickly and produce vigorous seedlings using simple materials.
✂ Materials You’ll Need

Air layering requires only basic household and garden supplies:
- Sharp knife or pruning blade
- Sphagnum moss or coco peat (moist, not soaking)
- Plastic wrap, cling film, or a transparent polythene sheet
- Twine, string, or zip ties
- Aluminum foil (optional for sunlight protection)
- Fungicide or cinnamon powder (optional but helps prevent infection)
- A healthy branch (1–2 cm thick)
🌱 Step-by-Step Guide: How to Create Seedlings with Air Layering
Follow these steps carefully for a near-100% success rate.
1. Choose the Right Branch
Pick a healthy, mature but flexible branch. Ideal qualities:
- 1–2 years old
- Pencil-thick or slightly thicker
- Leafy and healthy
- Located on the outer canopy for good sunlight
Avoid old, woody, or diseased branches.
2. Select the Air Layering Spot
Choose a section 15–30 cm from the branch tip. This area receives enough nutrients yet is mature enough to root quickly.

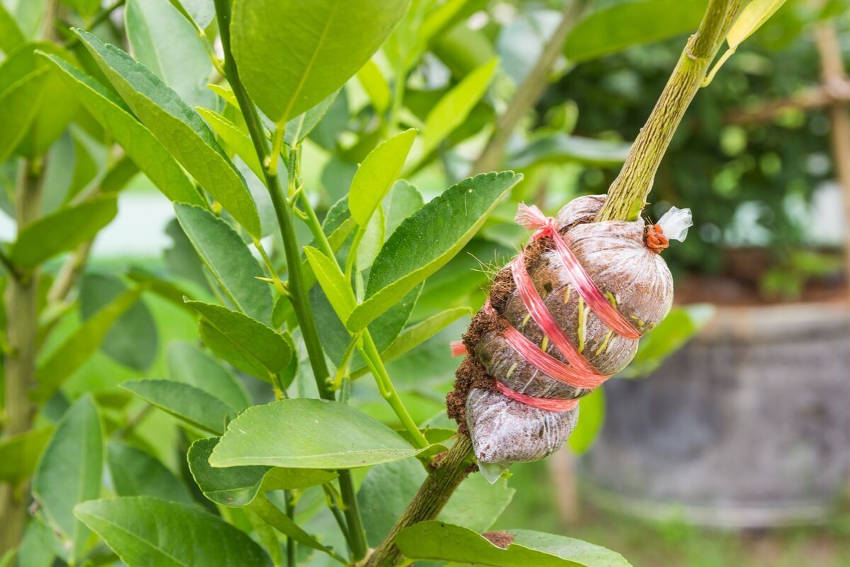
3. Make the Cut (Girdling Method)

This is the heart of the air layering technique.
Steps:
- Make two circular cuts around the branch, 2–3 cm apart.
- Connect the two cuts and peel the bark off completely.
- Scrape the exposed area lightly to remove the green cambium layer.
Why scrape the cambium?
It stops the wound from healing back and encourages roots to emerge.
You can dust the exposed area with cinnamon or a mild fungicide to avoid infection.
4. Wrap the Moss
Prepare the rooting medium:
- Soak sphagnum moss or coco peat
- Squeeze out excess water
- It should be moist but not dripping
Apply:
- Take a fistful of moss and place it around the exposed area.
- Press it gently so it fully covers the wound.
This keeps the area humid and encourages fast root formation.
5. Seal the Layer
Use cling film or plastic wrap to tightly secure the moss around the cut.
Make sure:
- No air enters
- Moisture stays locked inside
- The wrap is tight but not crushing the branch
Secure the ends with string or zip ties.
Optional Step:
Wrap aluminum foil around the plastic to protect from sunlight and overheating.
6. Wait and Maintain
Air layering takes 30–90 days, depending on the plant species.

What to check:
- Ensure the moss remains moist
- Watch for fungal growth
- If the plastic loosens, secure it again
In most cases, you’ll begin to see white roots forming through the transparent plastic within a month.
7. Cutting and Potting the New Seedling
Once the roots are visible and well-developed:
- Cut the branch 2–3 cm below the moss ball.
- Carefully remove the plastic but keep the moss around the roots.
- Plant it in a pot with loose, airy soil:
- 40% coco peat
- 30% garden soil
- 30% compost
Water thoroughly but avoid waterlogging.
Place the plant in partial shade for 10–14 days before moving it to full sun.
🌿 Caring for Your Air-Layered Seedlings
Once planted, your new seedling will grow quickly if you follow these tips:
1. Provide Filtered Light at First
Don’t shock the new plant. Gradually increase sun exposure.
2. Keep Soil Moist
But ensure good drainage to avoid root rot.
3. Use Mild Fertilizer
Organic compost or liquid seaweed helps early growth.
4. Prune for Shape
Encourage branching for stronger structure.

5. Protect from Strong Winds
Young seedlings are fragile until well established.
🌼 Most Common Mistakes to Avoid
Air layering is simple, but beginners often make these errors:
❌ Excessively wet moss
This suffocates the roots and promotes fungus.
❌ Not removing the cambium layer
The branch will heal instead of forming roots.
❌ Using thin or young branches
Weak branches fail to root properly.
❌ Unsealed plastic
Moisture escapes and delays root development.
❌ Cutting the seedling too early
Allow plenty of root development before removing it.
Avoiding these mistakes dramatically increases your success rate.

🌳 Why Air Layering Is the Perfect Method for Home Gardeners
Whether you live in a small apartment or have a large backyard, air layering offers unmatched benefits:
- No need for seeds
- No special equipment
- Works even in limited space
- Produces bigger, stronger plants fast
- Ideal for replicating high-quality fruit trees
- Saves money over buying nursery plants
Home gardeners who master air layering can expand their garden easily and economically.
🌱 Final Thoughts
Air layering is a magical combination of simplicity and high effectiveness. With just a knife, some moss, and plastic wrap, you can produce professional-quality seedlings from your favorite plants. This method is perfect for fruit trees, ornamentals, and woody plants that don’t root easily from cuttings.
By following the step-by-step guide and tips in this article, you can master the art of air layering and enjoy thriving, vigorous seedlings that grow faster and stronger than ever.